#how to update laravel version using composer
Explore tagged Tumblr posts
Visit Tumblr Blog
Explore Tumblr blogs with no restrictions, modern design and the best experience.
Last Seen Tumblr Blogs


Fun Fact
The Tumblr office adopted Tommy, an 11-year-old Pomeranian.
Text
SmartEnd CMS Nulled Script 10.0.4

Unlock the Power of SmartEnd CMS Nulled Script – Download for Free If you're looking for a dynamic and robust content management system that streamlines your development process and enhances your project efficiency, then SmartEnd CMS Nulled Script is exactly what you need. Designed for developers and digital creators who value power, flexibility, and intuitive interfaces, this script delivers high-performance capabilities without the hassle of building a CMS from scratch. Best of all, you can download it completely free from our website. What Is SmartEnd CMS Nulled Script? SmartEnd CMS is a Laravel-based admin dashboard and content management system built with clean code architecture, modular components, and a sleek modern interface. This script empowers developers to manage website content, media, and user roles seamlessly through a smart and responsive admin panel. Whether you're building a blog, corporate website, or custom web app, SmartEnd offers a quick-start solution to get your project running effortlessly. Technical Specifications Framework: Laravel 8+ Front-End: Bootstrap 4, jQuery, and FontAwesome Database: MySQL Multi-Language Support: Yes Responsive Design: Mobile-friendly interface Authentication: Role-based access control Key Features and Benefits of SmartEnd CMS Nulled Script The Nulled Script isn’t just another content manager—it’s a complete powerhouse that simplifies your development cycle. Here are some of its standout features: 1. User-Friendly Dashboard The admin panel is intuitive, clean, and highly responsive. Whether you're managing pages, posts, or user accounts, every feature is just a few clicks away. 2. Role Management System Assign different access levels to different users. From admin to editor to viewer, the built-in role manager keeps your data secure and structured. 3. Media Manager SmartEnd includes a dedicated file manager that allows you to upload, organize, and embed media files seamlessly across your site. 4. SEO Tools Optimize your content with meta tags, slugs, and SEO settings directly from the dashboard—no plugins required. 5. API-Ready Architecture Develop custom mobile or third-party applications with ease using the RESTful API support provided by SmartEnd CMS. Ideal Use Cases for SmartEnd CMS Script Whether you're a solo freelancer or part of a development agency, SmartEnd adapts to your needs. Here’s how you can leverage its capabilities: Corporate Websites: Build scalable and customizable websites for clients. Portfolios and Blogs: Display your work and ideas with flexible post types. Content Portals: Manage and publish multimedia content effectively. Startup Dashboards: Launch your MVP quickly with pre-built admin tools. How to Install SmartEnd CMS Nulled Script Setting up SmartEnd CMS Nulled Script is quick and straightforward. Follow these simple steps: Download the SmartEnd CMS Nulled Script from our website. Upload the script files to your hosting environment. Create a new MySQL database and update the .env configuration file. Run composer install to install necessary dependencies. Set permissions for storage and bootstrap/cache directories. Execute the php artisan migrate and php artisan db:seed commands. Access the admin dashboard via /admin and start customizing! Frequently Asked Questions Is SmartEnd CMS Nulled Script safe to use? Yes, we provide a clean and verified version of the script that has been tested for security and performance. Always download from trusted sources like our website to ensure safety. Can I use this script for commercial projects? Absolutely. The script is flexible and adaptable for commercial and personal use. You can modify it to suit your client or business requirements. Will I get updates? As this is a nulled version, automatic updates are not supported. However, we regularly update our repository with the latest versions, so be sure to check back often. Download SmartEnd CMS Nulled Script Now! Don’t miss out on this powerful, free CMS solution.
Download SmartEnd CMS today and experience the ease of modern web development without licensing fees or limitations. Our platform also offers a variety of free resources to support your journey. If you love SmartEnd, you might also be interested in the avada nulled theme for premium design capabilities. Looking for even more scripts and themes? Visit pro nulled to explore a vast library of premium tools—all available for free download.
0 notes
Text
Weak TLS/SSL Configuration in Laravel: How to Fix It
When developing web applications, ensuring the security of your website should always be a top priority. One common security vulnerability that can be easily overlooked is the weak TLS/SSL configuration in Laravel applications.

In this blog post, we'll explore what weak TLS/SSL configuration is, why it matters, and how you can fix it to ensure your Laravel application is safe from attacks. Additionally, we'll use our free website security checker tool to demonstrate how you can quickly check Website Vulnerabilities and prevent them.
What is TLS/SSL?
TLS (Transport Layer Security) and SSL (Secure Sockets Layer) are cryptographic protocols designed to provide secure communication over a computer network. Websites that utilize HTTPS (HyperText Transfer Protocol Secure) are using SSL/TLS to encrypt data exchanged between the user’s browser and the server.
Why is Weak TLS/SSL Configuration a Problem?
A weak TLS/SSL configuration can expose your website to various security vulnerabilities, such as:
Man-in-the-middle attacks – Hackers can intercept and alter data transmitted between the user and the website.
Downgrade attacks – Attackers can force the server to use outdated or vulnerable versions of TLS/SSL.
Data leakage – Sensitive data like login credentials, credit card numbers, etc., can be exposed during transmission.
To prevent these threats, it's essential to configure TLS/SSL settings properly and ensure that you're using the latest, most secure protocols and ciphers.
How to Check TLS/SSL Configuration in Laravel
You can check the TLS/SSL configuration of your Laravel application by running a vulnerability scan on your website. One simple way is to use our free website security checker tool at Pentest Testing. This tool analyzes your website’s security and generates a report that identifies weak configurations, including TLS/SSL settings.
Here’s how you can check:
Visit https://free.pentesttesting.com/.
Enter your website URL and click “Check”.
Review the report to see if any weak TLS/SSL configurations are detected.
Here’s a screenshot of the tool’s webpage:

Screenshot of the free tools webpage where you can access security assessment tools.
Fixing Weak TLS/SSL Configuration in Laravel
Laravel provides a straightforward way to configure secure HTTPS connections. Below are steps to fix weak TLS/SSL configurations:
Force HTTPS in the Environment File Laravel allows you to enforce HTTPS by setting the following in your .env file:
APP_URL=https://your-domain.com
This will make Laravel automatically redirect HTTP requests to HTTPS.
2. Use Strong Ciphers in config/ssl.php By default, Laravel doesn’t come with an SSL configuration file, but you can create a custom ssl.php config file in your application. Ensure you are using strong ciphers and the latest TLS versions. Here's an example configuration:
return [ 'tls_version' => 'TLSv1.2', // Use a secure version 'cipher' => 'TLS_ECDHE_RSA_WITH_AES_256_GCM_SHA384', // Strong cipher ];
3. Disable Weak Protocols and Ciphers Ensure that weak protocols like SSL 2.0 or SSL 3.0 are disabled on your server. You can configure this in your web server’s settings (Apache, Nginx, etc.) by disabling SSL v2 and v3, and only allowing TLS 1.2 and higher.
Apache Example: Add this configuration in the ssl.conf file:
SSLProtocol All -SSLv2 -SSLv3 SSLCipherSuite HIGH:!aNULL:!MD5:!3DES
Nginx Example: Add this to the nginx.conf:
ssl_protocols TLSv1.2 TLSv1.3; ssl_ciphers 'ECDHE-ECDSA-AES128-GCM-SHA256:ECDHE-RSA-AES128-GCM-SHA256:...';
4. Update Dependencies Always ensure that your Laravel application is up-to-date, as new versions often come with improvements to security settings. You can update Laravel with the following command:
composer update
Checking the Vulnerabilities Report
After making changes to your Laravel application's configuration, it's essential to check the improvements using a security tool. Our website security checker provides a detailed vulnerability assessment. Below is an example of what the assessment report looks like when checking for weak TLS/SSL configurations.

An Example of a vulnerability assessment report generated with our free tool, providing insights into possible vulnerabilities.
Conclusion
Properly configuring TLS/SSL in your Laravel application is crucial to keeping your website secure. By ensuring that your application uses strong encryption protocols and ciphers, you protect both your users and your data from potential attacks. Use tools like our free website security checker to help identify vulnerabilities and improve your site's overall security.
By following these steps and using tools like the free security checker, you can quickly detect and resolve weak TLS/SSL configurations in Laravel. If you need help with vulnerability assessment or penetration testing, feel free to reach out to us at Pentest Testing.
#cyber security#cybersecurity#data security#pentesting#security#the security breach show#laravel#php#ssl#tls
1 note
·
View note
Text
How to deploying Laravel projects on a live server – Complete Step-by-Step Guide
Learn How to deploying Laravel projects on a live server with this comprehensive guide. Step-by-step instructions on setting up hosting, configuring files, and deploying your Laravel app smoothly.Read Laravel Docs
How to deploying Laravel projects on a live server, you’ll need to follow a structured process. Here’s a step-by-step guide to help you:

1. Purchase Domain and Hosting
Make sure you have a domain and a hosting plan. Most shared hosting plans (like cPanel-based ones) or a VPS will work for Laravel, but ensure your server supports PHP and MySQL and meets Laravel’s requirements (PHP version, required extensions, etc.).
2. Prepare Your Laravel Project
Make sure your Laravel project is working locally.
Run the following command to clear any cached configuration and to optimize the project:
php artisan cache:clear
php artisan config:clear
php artisan route:clear
php artisan view:clear
Set up your environment variables (.env file). Make sure they are correctly configured for the live server (e.g., database, mail, and app URL settings).
3. Zip and Upload Your Laravel Project
Compress your entire Laravel project folder (without the node_modules and vendor directories) into a .zip file.
Use FTP (with FileZilla or any other FTP client) or File Manager in cPanel to upload the .zip file to your server. Typically, upload the file to the public_html or a subdirectory within it if you want to run your Laravel app in a subdirectory.
4. Extract the Files
Once uploaded, use File Manager in your hosting control panel to extract the .zip file.
5. Set Up the Public Directory
By default, Laravel’s entry point is the public folder, which contains the index.php file. On a shared hosting server:
Move everything in the public folder (including the .htaccess and index.php files) to the root directory (usually public_html).
Edit the index.php file to update the paths:
Change:
require __DIR__.'/../vendor/autoload.php';
$app = require_once __DIR__.'/../bootstrap/app.php';
To:
require __DIR__.'/vendor/autoload.php';
$app = require_once __DIR__.'/bootstrap/app.php';
This ensures that Laravel can find the necessary files in the correct directory.
6. Set File Permissions
Ensure that the following directories are writable by the server:
/storage
/bootstrap/cache
Use the following command via SSH (if available) or through the hosting file manager:chmod -R 775 storage chmod -R 775 bootstrap/cache
7. Set Up a Database
Create a MySQL database and a user with privileges in cPanel (or via SSH if using VPS).
Update the .env file with your database credentials:
DB_HOST=localhost DB_DATABASE=your_database_name DB_USERNAME=your_database_username DB_PASSWORD=your_database_password
8. Install Composer Dependencies
If you have SSH access:
SSH into your server using a terminal or a tool like PuTTY.
Navigate to your project directory
cd /path/to/your/project
Run Composer to install the dependencies:
composer install --optimize-autoloader --no-dev
If you don’t have SSH access, you can run composer install locally, zip the vendor folder, and upload it to the server.
9. Run Migrations
If you have SSH access, run the following command to migrate the database:
php artisan migrate --force
If you don’t have SSH access, you can run the migrations locally and then export/import the database to the server via phpMyAdmin.
10. Set App Key
Generate a new application key if you haven’t already:php artisan key:generate
Ensure the key is set in the .env file:
Read Full Tutorials
0 notes
Text
A Guide to Local Laravel Development in 2024: Tools and Trends

Local Laravel development forms the foundation for building robust web applications, and in 2024, the landscape is evolving with new tools and trends that streamline and enhance the development experience. This guide explores the latest advancements and equips you to set up a powerful local Laravel environment.
The Rise of Containerization with Laravel Sail
One of the most significant trends in Laravel development is the rise of containerization. Traditionally, setting up Laravel environments involved manually configuring dependencies and virtual machines. Laravel Sail, introduced in Laravel 8, simplifies this process by leveraging Docker containers. Sail provides a pre-configured development environment with essential dependencies like PHP, MySQL, and Node.js.
Key Benefits of Laravel Sail:
Reduced Setup Time: No more manual configuration; start with a single command.
Consistent Environment: Ensures every developer has the same setup regardless of their machine.
Improved Reproducibility: Facilitates easy sharing and replication of development environments.
Leveraging Testing Tools for a Robust Development Workflow
In 2024, a robust testing strategy remains crucial. Here are some key tools to integrate into your local Laravel development workflow:
PHPUnit: Laravel’s built-in testing framework for unit and integration tests.
Laravel Dusk: For browser automation and end-to-end testing of Laravel applications.
Debugging Tools: Laravel Telescope and Laravel Debugbar for debugging and monitoring applications.
Setting Up Your Development Environment
Setting up a robust local development environment is essential for efficient Laravel development. Here are some popular tools in 2024:
Laravel Valet: A lightweight development environment for macOS users, offering a seamless experience for running Laravel applications locally.
Homestead: A pre-packaged Vagrant box for Laravel development, suitable for developers using all major operating systems.
Docker: Containerization technology that enables developers to create consistent environments across development, testing, and production.
Version Control and Collaboration
Version control is fundamental for collaborative development:
Git: The most widely used version control system, essential for managing code changes and collaborating with teams.
GitHub, GitLab, Bitbucket: Platforms for hosting Git repositories and managing projects, offering features like issue tracking and pull requests.
Laravel Project Structure
Understanding the structure of a Laravel development project is crucial for organizing your codebase effectively:
app/: Contains the core code of the application, including models, controllers, and middleware.
config/: Configuration files for various services and components.
resources/: Contains assets such as views, language files, and front-end assets.
routes/: Contains route definitions for the application.
database/: Contains database migrations, seeders, and factories.
Dependency Management
Laravel projects use Composer for dependency management:
composer.json: Specifies the dependencies required by the
project.composer.lock: Lock file ensuring consistent dependency versions across installations.
Ready to Build Exceptional Laravel Applications?
Panoramic Infotech offers cutting-edge Laravel Development Services, leveraging the power of this popular PHP framework to create robust and scalable web applications. Contact Panoramic Infotech today to discuss your project and how we can help you leverage the power of Laravel for your business.
Let’s Build Together! Reach out to us at Contact Us to start your Laravel Development with Panoramic Infotech.
This guide equips you with the knowledge to set up a powerful local Laravel development environment in 2024. Remember, the best approach depends on your specific needs. Stay updated with the latest trends to streamline your development workflow and build exceptional Laravel applications.
#Laravel development company#Laravel we Laravel development services#b development company#laravel development#Laravel development solutions
0 notes
Text
How to Set Up Laravel 8 on Your Android Phone
Introduction
In today's fast-paced world, mobile devices have become an essential part of our lives, enabling us to stay connected and productive on the go. With the advancement of technology, it's now possible to set up a robust development environment on your Android phone, allowing you to work on projects even when you're away from your desktop. One such platform that empowers developers is Laravel 8, a popular PHP framework for web application development. In this tutorial, we will guide you through the process of setting up Laravel 8 on your Android phone using the Wama technology stack.
Why Laravel 8?
Laravel is renowned for its elegant syntax, powerful features, and comprehensive documentation. Laravel 8, the latest version at the time of writing, brings several improvements and new features that make it even more appealing for developers. Some of these enhancements include Laravel Jetstream for user authentication and scaffolding, enhanced job batching, dynamic Blade components, and improvements to the Artisan command-line interface.
Introducing Wama Technology
Wama technology is an innovative approach that enables you to create a development environment on your Android device. It combines Web Server for Android (WSA), a web server application for Android, with MySQL and PHP, to offer a complete stack for web development. With Wama technology, you can run web applications directly on your Android phone, allowing you to work on projects without the need for a traditional desktop setup.
Follow these steps to set up Laravel 8 on your Android phone using Wama technology:
Step 1: Install Wama Technology Stack
Open the Google Play Store on your Android phone.
Once installed, open the app and follow the instructions to start the server.
Step 2: Download Composer
Open the browser on your Android phone and navigate to https://getcomposer.org/download/.
Download the latest version of Composer.
Step 3: Install Laravel 8
Open the terminal in your Android device (you can use an app like Termux).
Navigate to the root directory of your web server (usually a folder named "htdocs" in the WSA directory).
Use the following command to install Laravel 8:
lua
Copy code
composer create-project --prefer-dist laravel/laravel myproject
Replace "myproject" with your preferred project name.
Step 4: Accessing Laravel 8 on Your Android Phone
Open the browser on your Android phone.
Enter the URL for your Laravel project. It will typically be something like http://localhost:8080/myproject/public/.
You should see the Laravel welcome page, indicating that your setup was successful.
Step 5: Configure the Database
Open the Web Server for Android app and click on the "MySQL" tab.
Open the .env file in your Laravel project and update the database configuration with the values you noted down.
Step 6: Start Developing
Congratulations! You now have Laravel 8 set up on your Android phone. You can start developing your web applications by editing the files in the "myproject" directory.
Tips for Efficient Development
While developing on your Android phone can be convenient, here are some tips to ensure an efficient workflow:
Use a Code Editor: Install a code editor app on your Android device for a better coding experience. Apps like "QuickEdit Text Editor" or "Dcoder, Compiler IDE" can be helpful.
You can set up Git on your Android phone using apps like "Termux."
Testing: Test your web applications on various devices and screen sizes to ensure responsiveness.
Backup: Regularly back up your projects to prevent data loss.
External Keyboard: Consider using an external keyboard for longer coding sessions to improve typing speed and comfort.
Conclusion
In this tutorial, we explored how to set up Laravel 8 on your Android phone using the Wama technology stack. This innovative approach empowers developers to work on web projects even when they are on the move. With the right tools and techniques, you can harness the power of Laravel 8 and create exceptional web applications, all from the convenience of your Android device. Embrace the flexibility and mobility that Wama technology offers and embark on your journey to efficient and productive laravel app development Services.
0 notes
Text
Top 6 PHP Tools to Use

In the dynamic world of web development, staying up-to-date with the latest tools and technologies is crucial. PHP, being one of the most widely used programming languages for web development, has a plethora of tools available to enhance the development process. In this comprehensive guide, we will dive into the top 6 PHP tools to use in 2023. These tools are designed to streamline your coding journey, improve productivity, and ultimately lead to exceptional web applications. Top 6 PHP Tools to Use in 2023: 1. PHPStorm - The All-in-One IDE for PHP Developers PHPStorm stands as a flagship integrated development environment (IDE) that caters specifically to PHP developers. With its powerful code editor, intelligent code completion, and support for popular PHP frameworks, PHPStorm empowers developers to write efficient and clean code. This tool's seamless integration with version control systems and database tools makes collaborative development a breeze. 2. Xdebug - Elevate Your Debugging Experience Debugging is an integral part of the development process, and Xdebug takes this aspect to the next level. This feature-rich debugging and profiling tool allows developers to identify and resolve bugs quickly. With its remote debugging capabilities and support for PHPUnit, Xdebug ensures that your PHP applications are rock-solid and error-free. 3. Composer - Manage Dependencies with Ease Gone are the days of manually managing dependencies. Composer, a dependency management tool, simplifies the process of integrating third-party libraries into your projects. With a user-friendly interface and a vast repository of packages, Composer lets you declare, install, and update project dependencies effortlessly. 4. PHPUnit - Ensure Code Reliability through Testing Writing tests is paramount to creating reliable and maintainable code. PHPUnit is a unit testing framework that aids in automating tests for your PHP codebase. By implementing test-driven development (TDD) principles, you can identify issues early in the development cycle and maintain code quality throughout the project. 5. Laravel - The Full-Stack PHP Framework Laravel has emerged as a popular PHP framework that facilitates rapid application development. Its elegant syntax, extensive documentation, and a wide range of built-in features make it an ideal choice for both beginners and experienced developers. Laravel's modular structure and active community ensure continuous updates and support. 6. Git - Version Control Made Effortless While not exclusive to PHP development, Git is an essential tool for any software project. Its distributed version control system allows developers to track changes, collaborate seamlessly, and manage different branches. Whether you're working solo or in a team, Git ensures code integrity and easy rollback options. FAQ's: Which PHP version is recommended for these tools? All the mentioned tools are compatible with the latest PHP versions, including PHP 8.0 and beyond. Using the latest PHP version ensures access to advanced language features and performance enhancements. Can these tools be used on different operating systems? Absolutely! The tools listed here are cross-platform, meaning they can be used on Windows, macOS, and various Linux distributions, providing flexibility to developers regardless of their preferred operating system. Are these tools suitable for beginners? Yes, these tools are designed to cater to developers of all skill levels. They offer user-friendly interfaces, extensive documentation, and a supportive community to help beginners get started and progress swiftly. Do these tools require a subscription fee? While some tools offer free versions with limited features, many provide premium versions with advanced capabilities. Depending on your development needs, you can choose the version that aligns with your requirements and budget. How can I learn to use these tools effectively? Each tool comes with its own documentation, tutorials, and online resources. Additionally, there are numerous online courses and communities dedicated to helping developers master these tools and maximize their potential. Can I contribute to the development of these tools? Absolutely! Most of these tools are open-source, allowing developers to contribute code, report issues, and even suggest new features. Contributing not only benefits the community but also enhances your own skills and expertise. Conclusion: As the field of web development continues to evolve, having the right set of tools at your disposal can make all the difference. The top 6 PHP tools to use in 2023, including PHPStorm, Xdebug, Composer, PHPUnit, Laravel, and Git, offer an array of features that streamline your development process, boost productivity, and ensure code quality. By harnessing the power of these tools, you can embark on a journey of innovation, efficiency, and excellence in PHP development. Read the full article
0 notes
Text
Evolution of PHP and Its Future
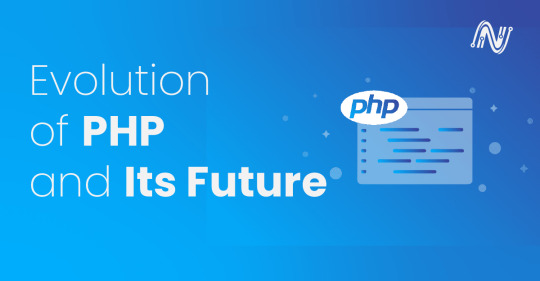
PHP stands for Hypertext Preprocessor, is a widely used scripting language for web development. Since its inception in the mid-1990s, PHP has evolved significantly, adapting to changing technology trends and incorporating new features and improvements. In this blog, we will delve into the evolution of PHP, exploring the significant versions, modern development practices, and the future outlook of this dynamic language. As a PHP developer or someone interested in web development, understanding the evolution of PHP is crucial to stay up to date with the latest advancements and make informed decisions when building web applications. So, let's embark on a journey through the evolution of PHP and discover how it has shaped the world of web development.
Evolution of PHP Versions
Since its inception, PHP has undergone several major releases, each bringing significant improvements and new features to the language. Let's explore the evolution of PHP versions and understand the key advancements in each iteration.
PHP 1:
The first version of PHP was released, providing basic functionality for web development.
PHP 2:
The second version of PHP introduced support for dynamic web pages and database connectivity.
PHP 3:
Support for object-oriented programming, which greatly enhanced the language’s capabilities.
PHP 4:
Introduced several new features, including support for XML, improved database connectivity, and the ability to create web services.
PHP 5:
Enhanced error handling mechanisms, Improved performance, and memory management.
PHP 7:
Introduction of the Zend Engine 3, Addition of scalar type declarations for function arguments and return values, Introduction of anonymous classes, and closure improvements.
PHP 8:
Introduce JIT compiler, Addition of union types, allowing variables and function return types to accept multiple possible types. Enabling metadata to be attached to classes, methods, and properties.
The evolution of PHP versions demonstrates the continuous effort to enhance the language's performance, flexibility, and functionality. Each release has introduced features and improvements to make PHP more robust, secure, and developer-friendly.
Modern PHP Development Practices
With the evolution of PHP, modern development practices have emerged, enabling developers to write more efficient, maintainable, and scalable code. Let's explore some of the critical practices that have gained popularity in the PHP ecosystem:
Object-Oriented Programming (OOP):
Embracing OOP principles allows developers to organize code into reusable objects and classes.
Encapsulation, inheritance, and polymorphism facilitate modular and structured code development.
OOP promotes code reusability, separation of concerns, and easier maintenance.
PHP Frameworks:
Utilizing PHP frameworks, such as Laravel, Symfony, or CodeIgniter, streamlines development by providing pre-built components, libraries, and MVC (Model-View-Controller) architecture.
Frameworks facilitate rapid development, code organization, and everyday tasks like routing, database handling, and user authentication.
They promote best practices and standardize coding conventions, leading to cleaner and more maintainable codebases.
Dependency Management:
Adopting dependency management tools like Composer simplifies the integration of external libraries and packages into PHP projects.
Composer allows developers to define project dependencies and automatically manages their installation and updates.
It promotes code reuse, reduces wheel reinvention, and ensures project dependencies are easily maintainable.
Unit Testing:
Writing unit tests using frameworks like PHPUnit helps ensure code correctness, identify and prevent bugs, and facilitate code refactoring.
Unit tests provide a safety net when making changes, allowing developers to validate that existing functionality remains intact.
Test-driven development (TDD) is an approach that emphasizes writing tests before writing the actual code, leading to more reliable and maintainable software.
PSR Standards:
The PHP Standards Recommendations (PSR) are guidelines and standards established by the PHP community to promote interoperability and consistency in PHP projects.
Adhering to PSR standards improves code readability, collaboration, and compatibility across different frameworks and libraries.
Following PSR standards ensures that codebases are well-structured, easily maintainable, and accessible to a broader community of developers.
Continuous Integration and Deployment (CI/CD):
Implementing CI/CD pipelines, utilizing tools like Jenkins or GitLab CI, automates the building, testing, and deployment of PHP applications.
Continuous integration ensures that code changes are regularly integrated into a shared repository, preventing integration issues.
Continuous deployment automates deploying code to production environments, ensuring a streamlined release process.
Future Outlook of PHP
PHP has come a long way since its inception, and its future looks promising as it continues to evolve and adapt to the ever-changing web development landscape. Let's explore some key aspects that shape the future outlook of PHP:
Performance and Scalability:
With the introduction of the Just-In-Time (JIT) compilation in PHP 8, performance improvements have already been made.
Further advancements in PHP's runtime engine and optimizations are expected, enhancing its performance and scalability for handling modern web applications.
Language Enhancements:
PHP's development community is continuously working on introducing new language features and improvements to enhance developer productivity and code maintainability.
Future PHP versions may introduce additional language constructs, syntactic sugar, and language-level abstractions to simplify everyday development tasks.
Security Enhancements:
PHP developers increasingly focus on security practices to protect applications from vulnerabilities and attacks.
The PHP community actively releases security updates, and future versions are expected to include enhanced security features and improved default security configurations.
Support for Modern Web Standards:
PHP is expected to continue adapting to modern web standards and technologies, such as HTTP/2, WebSockets, and Progressive Web Applications (PWAs).
Frameworks and libraries will continue to evolve to support these standards, enabling developers to build cutting-edge web applications.
Integration with Emerging Technologies:
PHP will likely integrate with emerging technologies like machine learning, artificial intelligence, and the Internet of Things (IoT).
Integration with these technologies will open up new possibilities for PHP developers to build intelligent and data-driven applications.
Community Growth and Collaboration:
The PHP community continues to grow, fostering collaboration, knowledge sharing, and open-source contributions.
PHP conferences, meetups, and online forums provide platforms for developers to connect, learn from each other, and stay updated with the latest trends and advancements.
Compatibility and Legacy Support:
PHP remains committed to backward compatibility, ensuring existing PHP applications can be migrated and maintained without significant disruptions.
Future PHP versions will likely strike a balance between introducing new features and maintaining compatibility with earlier versions.
Conclusion
PHP has evolved significantly over the years, transforming from a simple scripting language to a powerful and versatile tool for web development. In this blog, we explored the evolution of PHP versions, modern PHP development practices, adapting to modern PHP development tools, and the future outlook of PHP.
Are you looking for a trusted partner to develop your software projects?
Contact NodeSol Corp today and schedule a free consultation meeting.
0 notes
Text
Update laravel from 8 to 9
Update laravel from 8 to 9
Hello, everyone, as we know on the 8th of Feb 2022, the Laravel version 9(LTS), has been released, and to make our project more stable and less security issue we must have to update our project to laravel version 9. It took around 30 minutes to update your project from laravel 8 to laravel 9 Follow the below steps to update your project from laravel 8 to 9. Update/add laravel dependencies in…

View On WordPress
#composer update laravel 8#how to update laravel version using cmd#how to update laravel version using composer#update laravel 7 to 8#upgrade laravel 5 8 to 7#upgrade laravel 5 8 to 8#upgrade laravel 5.8 to 7#upgrade laravel 5.8 to 8#upgrade laravel 6 to 7#upgrade laravel 6 to 8
0 notes
Text
Laravel 6.0: What You Should Know

Since the inception of Laravel 5.0 around 4.5 years ago, the Laravel ecosystem has blossomed into something that leaves users nothing to complain about, to say the least. Laravel Nova, Laravel Horizon, Laravel Echo, Laravel Scout, and Laravel Passport are just some of the tools that have been introduced since then. At the time of this writing, we’re on Laravel 5.8 and Taylor Otwell has decided to skip past 5.9 on to 6.0 on the 3rd of September. Previously, Taylor has stressed that this won’t be a major paradigm shift for Laravel and the most significant change will be the transition to semantic versioning. However, this doesn’t mean that there aren’t plenty of new features worth talking about.
Let’s dive into some of the smaller changes first.
The Smaller Things
Authorization

Authorization messages can now be made easier for users to understand. Before Laravel 6.0, the infrastructure wasn’t in place to easily give a specific response to a user when they were given an authorization-related error. The status code could be given fairly easily, but giving a custom error message was more complicated back then. Giving a custom messaged required the developer to create a new file and write their own exceptions.
Now, to get a customizable authorization response, you can simply use the Gate::inspect method when linking to the function that enables you to receive the response. Delivery of the message to the front-end is also easy to organize. Simply add $this->authorize or Gate::authorize to a suitable route or controller.
No More Default Front-End
The typical front-end setup you are given when you first start a Laravel project is now gone. This means the Vue and Bootstrap code you would usually see, would have now been removed. What it’s been replaced with is unknown. Perhaps, it hasn’t been replaced. Strangely, the make:auth command, used to provide the login system scaffolding is now not a part of the original Laravel install either. To be honest, the rationale behind this change is unclear to me. However, given Laravel’s versioning adjustment, it makes sense that third-party technologies like Vue and Bootstrap that haven’t recently undergone the same changes could cause conflict. Though, this is merely speculation.
If you want access to the old UI, you can extract a composer package that contains it with the CLI: composer require laravel/ui and php artisan ui vue --auth.
Lazy Collections

This is one of the more interesting additions. If you’re new to Laravel, Collections are tools that make it easier for you to manipulate arrays. Eloquent, one of the two main tools in Laravel used to communicate with databases, returns its queries as Collection instances. Check out the docs for Collections if you think you’re gonna lack context in a moment. https://laravel.com/docs/5.8/collections
So, what are Lazy Collections? Traditional Collections are often used for working with large amounts of data. When they run into data-heavy files, they’ll try and store all of that data at once. This may sound quick and convenient but the downside is that this is very memory-taxing. Lazy Collections solve this problem by only storing the part of the file they need, and thus, save memory usage and boost performance.
If you understand how lazy loading works then you’ll be familiar with my previous explanation. Lazy loading works the same way. When you make a request to the server with lazy loading implemented, the browser will only return the part of the web page it knows you’re going to use immediately. Then, when the user scrolls down the page or clicks on an internal link, the server will provide you the necessary content it knows you need. This way, only memory that is needed at that particular moment is being used. This method increases speed. Lazy Collections is kind of like lazy loading but with arrays from a database and not content on a webpage.
The Bigger Things
Laravel Ignition
So yeah, the new error page for Laravel is called Ignition and it looks awesome. It’ll be the default error page for Laravel when 6.0 releases. However, if you don’t feel like making the switch to 6.0 just yet, that’s fine, you can still install Ignition on previous versions. Let’s talk about what Ignition brings to the table.
With Whoops (the current default Laravel error page), stack traces and relevant code snippets are shown in an error page, but this doesn’t always lead the developer to the solution. Worse, sometimes the stack traces just reference compiled paths. This can it make it difficult to find the necessary non-compiled files to fix because they aren’t listed anywhere on the error page. Thankfully, this isn’t a problem with Ignition, it can display to you the non-compiled file where the problem actually exists. By clicking on a pencil icon, you can go directly to the file in your chosen editor.
The second coolest feature of Ignition is that it can display potential solutions when displaying an error message. Most error pages just leave you with the error. For example, if the error is that you misspelled a property name, Ignition will tell you that the property has been misspelled and offer you the correct spelling. Solution suggestions can be way more sophisticated than this, I’ll link you to the source down below. Your suggestions are even customizable!
You wanna know the coolest feature? These solution suggestions are actually runnable!

Yes, really. Take a look at this short demo by one of the creators, Freek Van der Herten.
https://youtu.be/EZu0-CwTU9Q
Also, you can add your own runnable solutions too! This is great as Ignition is open source so people in the Laravel community will undoubtedly contribute their own solutions for everyone to use.
There’s a bunch of other cool features too such as creating your own tabs (yes Ignition has tabs) and sharing your error messages with other people. This is done using Flare, a tool that comes with Ignition.
For everything about Laravel Ignition and Flare, visit https://freek.dev/1441-ignition-a-new-error-page-for-laravel.
Laravel Vapor

Another big one. Laravel Vapor is a serverless deployment platform for Laravel. But wait, why do we need a deployment platform? We already have Laravel Forge, right? As beloved as Forge is amongst the Laravel community, it does have its limitations. It doesn’t have autoscaling to deal with large sudden increases in traffic that prevent your site from crashing. Also, configuration is required when OS or PHP updates occur. Vapor has autoscaling, so, you don’t have to worry about sudden spikes in your traffic causing website downtime. In addition, because of the serverless structure of Vapor, it also handles all the updates you may stress about when using Forge.
Vapor’s website is very clean looking and everything seems easy to find. When you deploy a project, you can see the different stages of the deployment process loading on the UI. I find this to be very reassuring and comforting. You can also rollback your application with a click of a button. Just click on “rollback” and it’ll do just that. Pretty neat. Same deal if you want your app to undergo maintenance. Just click on the “maintenance mode” button.
Another cool feature of Laravel Vapor is that you’re able to set alarms. What do I mean by that? For example, to know when your website traffic suddenly blows up, you can set a certain amount of HTTP requests per minute, and if your website hits that limit, the alarm will go off, informing you of the surge in traffic. Taylor Otwell showcases this and other conditionals in his Laravel Vapor demo which I’ll link to below.
There’s so much to cover with Laravel Vapor and the Laravel update itself. Because of this, I didn’t really want to dive into the complexities too much in this post. To learn more about the technical aspects of Laravel 6.0, you can take a look at the release notes here https://laravel.com/docs/6.0/releases. For more info on Laravel Vapor, visit this video by Taylor Otwell https://www.youtube.com/watch?v=XsPeWjKAUt0&t=362s.
1 note
·
View note
Text
Empowering Laravel API Creation: Kickstart Your Success Today With No. 1 Tutorial!

What is Laravel API? Laravel is a popular open-source PHP web application framework. It offers an easy way to develop web applications and provides a wide range of features such as routing, session management, authentication and caching. The most interesting feature of Laravel is its ability to create an API (Application Programming Interface). An API allows developers to create applications that interact with other systems or services. The Laravel API provides an easy way to create secure APIs for your project that other systems or devices can easily consume. It includes authentication, authorization and data validation tools, so you don't have to worry about writing code for these tasks. The Laravel API also has built-in support for creating RESTful APIs, which makes it faster and easier to develop APIs without having to write complicated code from scratch. Finally, the Laravel API contains a package suite that allows developers to quickly add functionality such as messaging, payment processing and image handling into their projects. Setting up the Environment Setting up the environment for a Laravel API is easy. Firstly, you need to install the latest version of PHP and either Apache or Nginx web server. Once those are installed, you can download and install Composer - the tool that allows us to manage our dependencies. After that, it's just a matter of running the commands from Composer to create a new Laravel project with all its dependencies set up correctly. To configure your environment further, you can create a .env file containing environment variables used by your application code. Lastly, you should configure your web server, so it knows how to serve files generated by your Laravel application. Authentication & Authorization Authentication is the process of verifying a user's identity to determine that they are who they say they are. On the other hand, authorization is the process of authorizing a user's access rights to certain resources or data according to their identity. Together, authentication and authorization provide the security necessary for an API-driven application. Laravel provides its authentication mechanism, which makes it easy to secure your API endpoints with simple user registration and login features. The Laravel framework can also be used for authorization by access control mechanisms like roles and permissions that authorize users based on their role or permission level. Additionally, Laravel can be used for two-factor authentication (2FA) and social media OAuth integration for added security measures. These security protocols ensure that only authorized users can access your API's data and resources. Configuring Routes Routes are essential for configuring your Laravel application to work correctly. When setting up routes, you must specify the type of request that will be handled, the URI of the request, and which action should take place in response. You can also specify middleware on a route-by-route basis to protect your application from potential security threats. Routes can be defined in the web.php or api.php files located in the routes directory within your Laravel project directory. When configuring routes for an API, you must use a combination of HTTP verbs and URI segments to define each route's action. Commonly used verbs include GET (to retrieve data), POST (to create new data), PUT/PATCH (to update existing data), and DELETE (to delete existing data). You may also need to define parameters with specific values that may be passed into a controller method when handling an incoming request. This allows your application to respond differently depending on which parameter is set by the client making the request. Working With Database Database management is an essential part of working with Laravel. It provides a unified interface for managing databases and running queries directly from the application code. The Eloquent ORM in Laravel makes it easy to access and manipulate data stored in the database. To use Eloquent, you need to define your database schema using migrations. Migrations allow you to easily create, modify, and delete tables, fields, indexes and other components that make up your database structure. After defining the database structure, you can use Eloquent's active record implementation to interact with the database without having to write any SQL statements yourself. You can also write raw SQL queries using Laravel's Query Builder or DB facade class if needed. Working with databases in Laravel is simple and efficient thanks to these tools and features that make it easier for developers of all experience levels to leverage its powerful capabilities.

Testing & Debugging Testing and debugging are essential steps for developing a Laravel API. To ensure that the code meets all requirements, it's important to test out the functionality of the API before deploying it to production. Testing should be done at every stage of development, from initial unit tests to integration tests and end-to-end testing. Debugging is also important in developing a Laravel API, as errors may occur due to incorrect configurations or unforeseen interactions between components. Various tools like xdebug can be used to debug and identify the root cause of issues quickly. Lastly, performance testing should be addressed as it helps determine how well your system performs under certain load levels and enables you to optimize accordingly.
Conclusion: Get Started with Laravel API!
Once you have learned how to create an API using Laravel, it is time to get started. To begin, you will need a web server and a database server. You can use Apache for your web server and MySQL for your database server. Next, install Composer on your computer, a dependency manager for PHP packages that will help you install Laravel. Finally, install Laravel by running the command "composer create-project --prefer-dist laravel/laravel". After installation, you are ready to start building your API in Laravel! You can create an API controller in a few simple steps: - Add routes to routes/api.php file. - Define methods in the controller class. - Use model classes as needed. - Return data in JSON format from each endpoint (route). Additionally, authentication should be implemented when necessary and pagination if returning large sets of data. By following these simple steps, you are well on your way toward creating a fully functioning API that uses Laravel! What is Laravel API? Laravel API is a feature in the Laravel web application framework that allows developers to create secure APIs for their projects that can be consumed by other systems or devices. What are the benefits of using Laravel API? Using Laravel API can make it easier and faster to develop APIs without having to write complicated code from scratch. It includes authentication, authorization, and data validation tools to ensure the security of your APIs. Laravel API also has built-in support for creating RESTful APIs and a package suite that allows developers to quickly add functionality to their projects. How do I set up the environment for a Laravel API? To set up the environment for a Laravel API, you need to install the latest version of PHP and either Apache or Nginx web server. Then, you can download and install Composer, the tool that allows us to manage our dependencies. After that, it's just a matter of running the commands from Composer to create a new Laravel project with all its dependencies set up correctly. How does authentication and authorization work in Laravel API? Authentication and authorization are essential security protocols that ensure only authorized users can access your API's data and resources. Laravel provides its authentication mechanism, which makes it easy to secure your API endpoints with simple user registration and login features. Additionally, Laravel can be used for authorization by access control mechanisms like roles and permissions that authorize users based on their role or permission level. How do I configure routes for my Laravel API? When configuring routes for a Laravel API, you must use a combination of HTTP verbs and URI segments to define each route's action. Commonly used verbs include GET (to retrieve data), POST (to create new data), PUT/PATCH (to update existing data), and DELETE (to delete existing data). You may also need to define parameters with specific values that may be passed into a controller method when handling an incoming request. How do I work with databases in Laravel API? Database management is an essential part of working with Laravel API. The Eloquent ORM in Laravel makes it easy to access and manipulate data stored in the database. To use Eloquent, you need to define your database schema using migrations. After defining the database structure, you can use Eloquent's active record implementation to interact with the database without having to write any SQL statements yourself. You can also write raw SQL queries using Laravel's Query Builder or DB facade class if needed. Read the full article
1 note
·
View note
Text
What’s New in Laravel 9.0 – New Features & Updates
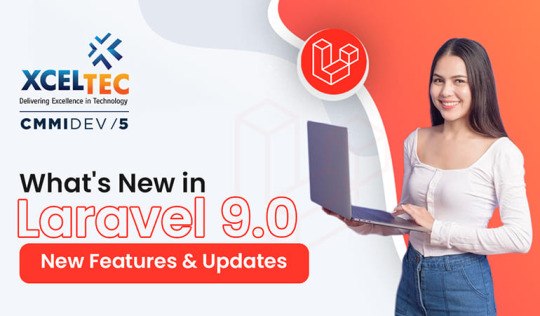
Laravel is a popular open-source PHP web application framework known for its elegant syntax. It is an MVC framework that adheres to the MVC architectural pattern (model-view-controller) precisely and can be used to develop simple to sophisticated web applications in PHP. In recent years, Laravel has become one of the most widely used PHP frameworks for building robust and distinctive online projects. Laravel will now release new versions around every 12 months rather than on a six-monthly basis.
What’s Laravel 9?
The most recent version, Laravel 9, has a lot of new features. The first long-term support (LTS) release to be issued after the 12-month release cycle is Laravel 9, which was delayed to January 2022. PHP versions 8.0 and 8.1 are supported by Laravel 9, which provides two years of bug fixes and three years of security (will receive security fixes until February 2025).
Let's look at the improvements and new features included in Laravel's next major version.
Minimum PHP Requirement: For testing, Laravel 9 needs the most recent versions of PHP 8 and PHPUnit. This is due to the fact that Laravel 9 will use the most recent Symfony v6.0, which also needs PHP 8.
Symfony Mailer: You can easily start sending email through the local or cloud-based service of your choosing thanks to Symfony Mailer's drivers for SMTP, Mailgun, Postmark, Amazon SES, and Sendmail.
Flysystem 3.0: You are shielded against vendor lock-in with the fly system. It is a PHP library for file storage. It offers a single interface for interacting with many file system types.
Anonymous Stub Migration: It resolves a GitHub problem with duplicate migration class names. To take advantage of this functionality in Laravel 8, named migration classes are also backwards-compatible.
PHP 8 String Functions: When a string is found in another string, the function determines whether it is contained there and produces a boolean result (true/false).
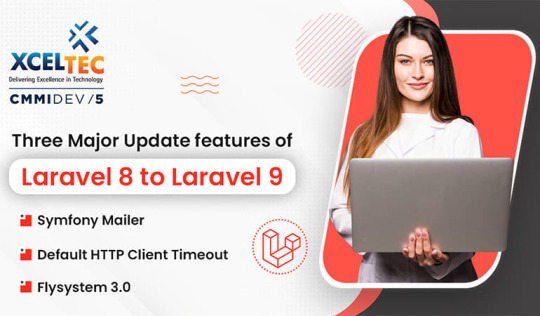
Let's look at what's new in Laravel 9 and why you should migrate from Laravel 8 to Laravel 9.
Symfony Mailer:
For your mobile application, Laravel 9 has switched from the SwiftMailer library to the Symfony Mailer library, which offers more consistency.
Default HTTP Client Timeout:
For HTTP clients, Laravel 9 has a default timeout of 30 seconds. This action will assist in preventing hangs that happened with the previous version.
Flysystem 3.0:
Flysystem 1. x has been replaced by Flysystem 3. x in Laravel version 9. x, which now powers the Storage facade's file manipulation methods.
How to Install the Latest Laravel 9.0
The methods shown below will assist you in upgrading to Laravel 9 and walk you through the straightforward installation process.
Step:1 Create a Laravel project using the below command:
composer create-project –prefer-dist laravel/laravel laravel-9-dev test-laravel9
Step: 2 If you have a Laravel installation, proceed to the next step.
laravel new laravel-9-dev –dev
Step: 3 After installing Laravel 9, use this command to check your version.
cd dev-laravel9
PHP artisan –version
Benefits of Hire Laravel Team from XcelTec:
The talented Laravel developers at Xceltec are experts in all facets of building bespoke websites and mobile-based applications. Our team of Laravel developers has experience in Laravel website design, development, and modification, making the website speedy and easy to use.
We can also provide you with a website solution for PHP application development. Choose our talented and experienced web development team for your specific project needs.
Summary:
This blog details the features of Laravel 9 and what to look forward to in upcoming updates. It also covered installing the latest Laravel 9 and app development with it. You may quickly create web apps with this latest Larave sl 9 edition.
Since TopDevelopers.co is fully aware that XcelTec offers world-class bespoke app development services, Xceltec has been included as one of the top mobile app development companies.
Visit to explore more on What’s New in Laravel 9.0 – New Features & Updates
Get in touch with us for more!
Contact us on:- +91 987 979 9459 | +1 919 400 9200
Email us at:- [email protected]
1 note
·
View note
Text
DOKANS Nulled Script 3.9.2

Unlock E-commerce Potential with DOKANS Nulled Script Are you ready to transform your online business into a fully functional multitenant e-commerce platform without spending a fortune? DOKANS Nulled Script offers an unbeatable opportunity to create a scalable, efficient, and dynamic online marketplace—absolutely free. Whether you're a budding entrepreneur or an established developer, this powerful script provides the backbone for launching your own SaaS-based multi-vendor store in no time. What Is DOKANS Nulled Script? DOKANS Nulled Script is a premium multitenancy-based e-commerce platform designed specifically for creating software-as-a-service (SaaS) marketplaces. It allows users to build independent stores under a single ecosystem, offering flexibility, scalability, and seamless customization. With this nulled version, you can enjoy all the premium features without the hefty price tag, making it ideal for developers, resellers, and digital entrepreneurs. Technical Specifications Framework: Laravel (Backend) + Vue.js (Frontend) Database: MySQL/MariaDB Server Requirements: PHP 7.4 or higher, Apache/Nginx Multitenancy: Built-in SaaS capabilities Security: Advanced user authentication and permission systems Outstanding Features and Benefits When you download the DOKANS Nulled Script, you gain access to a powerhouse of tools tailored for modern e-commerce: 1. Multitenancy Support Let your users create and manage their own e-commerce stores under a unified platform. Each store operates independently with its own admin panel and branding. 2. Drag-and-Drop Page Builder Design custom pages effortlessly with an intuitive page builder. No coding knowledge required! 3. Flexible Subscription System Create revenue streams by offering tiered subscription plans to vendors. Manage upgrades, renewals, and custom packages with ease. 4. Secure and Optimized Enjoy enterprise-level security measures, regular updates, and optimized performance to handle growing traffic and vendors without lag. 5. Rich Admin Dashboard Access detailed analytics, financial reports, and vendor performance metrics from a beautifully designed admin panel. Practical Use Cases Launch a digital marketplace for fashion, electronics, or niche products Offer SaaS-based storefronts to clients and freelancers Create white-label solutions for local businesses and communities Monetize by charging store owners subscription fees or commissions How to Install DOKANS Nulled Script Download the latest version of DOKANS Nulled Script from our website. Extract the files to your server's root directory. Set up the database and import the SQL file provided. Edit the .env file with your database and app credentials. Run the necessary Laravel commands: composer install, php artisan migrate, and php artisan serve. Access the admin panel and begin configuring your multi-vendor platform. FAQs – Your Questions Answered Is DOKANS Nulled Script safe to use? Yes, the nulled script is thoroughly tested and secure for usage. However, always use a trusted source—like our website—for downloads to avoid hidden malware or vulnerabilities. Can I use this script for commercial purposes? Absolutely. With DOKANS Nulled Script, you can launch your commercial marketplace, monetize it with subscriptions, and offer clients fully functional e-commerce solutions. Do I need to know coding to use this? No coding skills are required for basic usage. The platform is beginner-friendly with intuitive interfaces. Advanced users can easily customize the backend thanks to its Laravel-Vue architecture. Where can I find compatible plugins or themes? You can enhance your site with additional tools like elementor nulled pro for intuitive design customization. Is there support or a user community? While nulled versions don’t offer official support, you can find active user communities and tutorials online. Plus, our platform is always here to help with guides and updates. Final Thoughts If
you're looking for a high-performance SaaS e-commerce script without the high cost, DOKANS Nulled Script is the answer. It's packed with features, easy to use, and completely free—giving you the ultimate edge in launching your own online marketplace today. Don't miss out on this game-changing opportunity to build and scale your digital empire. Want to enhance your site even further? Try out Slider Revolution NULLED and unlock limitless design possibilities!
0 notes
Text
How to Install and Use PHP Composer on Ubuntu 22.04
How to Install and Use PHP Composer on Ubuntu 22.04
PHP Composer is a popular dependency management solution that was designed with the aim to make updates and dependencies installation easier. This tool determines the required packages and installs it on your system using the right version based on the project’s need. PHP Composer is also majorly utilized to start new projects with the help of PHP frameworks such as Laravel and Symfony. This blog…

View On WordPress
0 notes
Text
Jwt Secret Key Laravel
Jwt Secret Key Laravel Free
Jwt Secret Key Laravel Download
Secret Key Indonesia
Secret Key Rotom
Throughout this tutorial, we’ll be learning how to authenticate REST APIs using JWT in the latest Laravel 8 version. You will learn how to create a REST API using Laravel 8 with JWT authentication.
Laravel 6 Rest API using JWT Authentication. JWT authentication provides a secure way to transmit data between the client and server using Laravel APIs. In this post, we will look at how we can create a JWT authentication for a Laravel based API. API’s provide a fluent interface to communicate with the different type of services. Step 5 — Generating a JWT Secret Key. After configuring JWT authentication in our Laravel 8 app. We’ll need to generate a JWT secret key in this step. Head over to your terminal and run the following command to generate the JWT secret key: $.
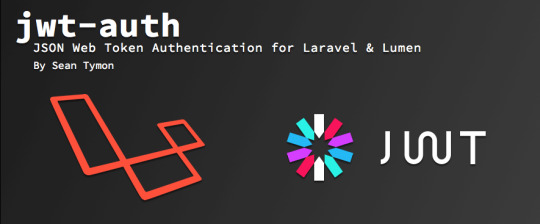
We’ll see how to set up JWT authentication in Laravel 8 and implement a secured REST API using the tymon/jwt-auth package.
Laravel 8 JWT Authentication Tutorial by Example
In this tutorial, we’ll see step by step to implement a REST API with PHP and Laravel 8 with authentication via JWT tokens.
Step 1 — Creating a Laravel 8 Application
Let’s start our tutorial by creating a Laravel 8 application using Composer — the dependency management tool for PHP developers.
Head over to a new command-line interface and run the following command:
Step 2 — Configuring a MySQL Database
After creating your Laravel 8 application using Composer, let’s configure a MySQL database in our second step.
Open the .env file located in the root of your Laravel 8′ application. Next, add the following database configuration information:
Step 3 — Installing jwt-laravel
Now that we have a Laravel 8 application with a MySQL database configured, let’s start implementing JWT authentication by installing the jwt-auth package.
Head back to your terminal and run the following command from the root of your project’s folder:
Step 4 — Setting up JWT Authentication in Laravel 8
At this step, we have a Laravel 8 application with MySQL configured. We also installed the jwt-auth library in the previous step. Now, let’s set up JWT authentication in our application.
Head to the config/app.php file and add JWT providers and aliases as follows:
Next, head back to your terminal and run the following command:
Step 5 — Generating a JWT Secret Key
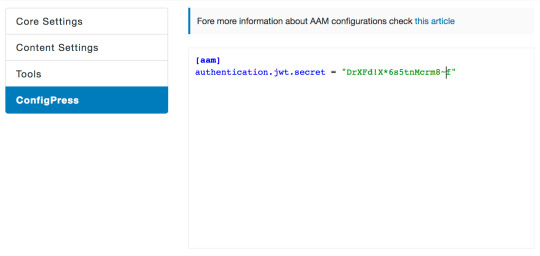
After configuring JWT authentication in our Laravel 8 app. We’ll need to generate a JWT secret key in this step.
Head over to your terminal and run the following command to generate the JWT secret key:
Next, open the vendor/tymon/src/Commands/JWTGenerateCommand.php and update it as follows:
Step 6 — Implementing JWT Authentication in Laravel 8 User Model
After configuring JWT in Laravel 8. In this step, we’ll implement it in the User model.
Open the App/User.php file, and update it as follows:
Step 7 — Implementing the REST API Controller for JWT Authentication
Let’s now implement a Laravel 8 controller for handling JWT authentication in our REST API application.
Head back to your terminal and run the following command to generate a controller:
Next, open the app/http/controllers/JwtAuthController.php file, and add the following methods:
Step 7 — Add Laravel 8 REST API Routes
Now that we have implemented JWT authentication in our Laravel 8 User model. In this step, we’ll proceed to create our REST API routes.
Open the routes/api.php file, and update it as follows:
Step 9 — Serving your Laravel 8 REST API Authentication App
After implementing JWT authentication in our Laravel 8 REST API application, let’s run our local development server using the following command:
Conclusion
Throughout this tutorial, we’ve seen step by step how to implement JWT authentication to secure and protect your REST API endpoints created with PHP and Laravel 8.
This post was originally posted on https://shabang.dev/laravel-8-rest-api-authentication-with-jwt-tutorial-by-example/
Throughout this tutorial, we’ll be learning how to authenticate REST APIs using JWT in the latest Laravel 8 version. You will learn how to create a REST API using Laravel 8 with JWT authentication.
We’ll see how to set up JWT authentication in Laravel 8 and implement a secured REST API using the tymon/jwt-auth package.
Laravel 8 JWT Authentication Tutorial by Example
In this tutorial, we’ll see step by step to implement a REST API with PHP and Laravel 8 with authentication via JWT tokens.
Step 1 — Creating a Laravel 8 Application
Let’s start our tutorial by creating a Laravel 8 application using Composer — the dependency management tool for PHP developers.
Head over to a new command-line interface and run the following command:
Step 2 — Configuring a MySQL Database
After creating your Laravel 8 application using Composer, let’s configure a MySQL database in our second step.
Open the .env file located in the root of your Laravel 8′ application. Next, add the following database configuration information:
Step 3 — Installing jwt-laravel
Now that we have a Laravel 8 application with a MySQL database configured, let’s start implementing JWT authentication by installing the jwt-auth package.
Head back to your terminal and run the following command from the root of your project’s folder:
Step 4 — Setting up JWT Authentication in Laravel 8
At this step, we have a Laravel 8 application with MySQL configured. We also installed the jwt-auth library in the previous step. Now, let’s set up JWT authentication in our application.
Head to the config/app.php file and add JWT providers and aliases as follows:
Next, head back to your terminal and run the following command:
Jwt Secret Key Laravel Free
Step 5 — Generating a JWT Secret Key
After configuring JWT authentication in our Laravel 8 app. We’ll need to generate a JWT secret key in this step.
Head over to your terminal and run the following command to generate the JWT secret key:
Next, open the vendor/tymon/src/Commands/JWTGenerateCommand.php and update it as follows:
Step 6 — Implementing JWT Authentication in Laravel 8 User Model
After configuring JWT in Laravel 8. In this step, we’ll implement it in the User model.
Open the App/User.php file, and update it as follows:
Step 7 — Implementing the REST API Controller for JWT Authentication
Let’s now implement a Laravel 8 controller for handling JWT authentication in our REST API application.
Head back to your terminal and run the following command to generate a controller:
Next, open the app/http/controllers/JwtAuthController.php file, and add the following methods:
Step 7 — Add Laravel 8 REST API Routes
Now that we have implemented JWT authentication in our Laravel 8 User model. In this step, we’ll proceed to create our REST API routes.
Open the routes/api.php file, and update it as follows:
Jwt Secret Key Laravel Download
Step 9 — Serving your Laravel 8 REST API Authentication App
After implementing JWT authentication in our Laravel 8 REST API application, let’s run our local development server using the following command:
Secret Key Indonesia
Conclusion
Secret Key Rotom
Throughout this tutorial, we’ve seen step by step how to implement JWT authentication to secure and protect your REST API endpoints created with PHP and Laravel 8.
This post was originally posted on https://shabang.dev/laravel-8-rest-api-authentication-with-jwt-tutorial-by-example/
0 notes
Text
Top 6 PHP Tools to Use
In the dynamic world of web development, staying up-to-date with the latest tools and technologies is crucial. PHP, being one of the most widely used programming languages for web development, has a plethora of tools available to enhance the development process. In this comprehensive guide, we will dive into the top 6 PHP tools to use in 2023. These tools are designed to streamline your coding journey, improve productivity, and ultimately lead to exceptional web applications. Top 6 PHP Tools to Use in 2023: 1. PHPStorm - The All-in-One IDE for PHP Developers PHPStorm stands as a flagship integrated development environment (IDE) that caters specifically to PHP developers. With its powerful code editor, intelligent code completion, and support for popular PHP frameworks, PHPStorm empowers developers to write efficient and clean code. This tool's seamless integration with version control systems and database tools makes collaborative development a breeze. 2. Xdebug - Elevate Your Debugging Experience Debugging is an integral part of the development process, and Xdebug takes this aspect to the next level. This feature-rich debugging and profiling tool allows developers to identify and resolve bugs quickly. With its remote debugging capabilities and support for PHPUnit, Xdebug ensures that your PHP applications are rock-solid and error-free. 3. Composer - Manage Dependencies with Ease Gone are the days of manually managing dependencies. Composer, a dependency management tool, simplifies the process of integrating third-party libraries into your projects. With a user-friendly interface and a vast repository of packages, Composer lets you declare, install, and update project dependencies effortlessly. 4. PHPUnit - Ensure Code Reliability through Testing Writing tests is paramount to creating reliable and maintainable code. PHPUnit is a unit testing framework that aids in automating tests for your PHP codebase. By implementing test-driven development (TDD) principles, you can identify issues early in the development cycle and maintain code quality throughout the project. 5. Laravel - The Full-Stack PHP Framework Laravel has emerged as a popular PHP framework that facilitates rapid application development. Its elegant syntax, extensive documentation, and a wide range of built-in features make it an ideal choice for both beginners and experienced developers. Laravel's modular structure and active community ensure continuous updates and support. 6. Git - Version Control Made Effortless While not exclusive to PHP development, Git is an essential tool for any software project. Its distributed version control system allows developers to track changes, collaborate seamlessly, and manage different branches. Whether you're working solo or in a team, Git ensures code integrity and easy rollback options. FAQ's: Which PHP version is recommended for these tools? All the mentioned tools are compatible with the latest PHP versions, including PHP 8.0 and beyond. Using the latest PHP version ensures access to advanced language features and performance enhancements. Can these tools be used on different operating systems? Absolutely! The tools listed here are cross-platform, meaning they can be used on Windows, macOS, and various Linux distributions, providing flexibility to developers regardless of their preferred operating system. Are these tools suitable for beginners? Yes, these tools are designed to cater to developers of all skill levels. They offer user-friendly interfaces, extensive documentation, and a supportive community to help beginners get started and progress swiftly. Do these tools require a subscription fee? While some tools offer free versions with limited features, many provide premium versions with advanced capabilities. Depending on your development needs, you can choose the version that aligns with your requirements and budget. How can I learn to use these tools effectively? Each tool comes with its own documentation, tutorials, and online resources. Additionally, there are numerous online courses and communities dedicated to helping developers master these tools and maximize their potential. Can I contribute to the development of these tools? Absolutely! Most of these tools are open-source, allowing developers to contribute code, report issues, and even suggest new features. Contributing not only benefits the community but also enhances your own skills and expertise. Conclusion: As the field of web development continues to evolve, having the right set of tools at your disposal can make all the difference. The top 6 PHP tools to use in 2023, including PHPStorm, Xdebug, Composer, PHPUnit, Laravel, and Git, offer an array of features that streamline your development process, boost productivity, and ensure code quality. By harnessing the power of these tools, you can embark on a journey of innovation, efficiency, and excellence in PHP development. Read the full article
0 notes
Link

Disclaimer: I’m writing about my experience with major OS (Windows 10, macOs High/Sierra, Ubuntu/Manjaro) using a Solid State Drive. It has a huge impact in term of speed and it could be different from your own experience.
Hello there. To begin with, this post isn’t about what’s the best OS for everyday programming, it could depend on the stack used, Misc programs and specially YOU, so i’ll try to describe all the good/bad things that happened during my everyday workflows.
But before that I should let you know my programming stack so you won't get confused later. I mainly use:
PHP frameworks and CMS
nodejs frameworks for frontend
react native/ionic for mobile dev
Photoshop (with CssHat) for HTML Integration, banner for mobile apps.
ms office due to my current job.[1]
Ubuntu (Unity/Gnome):
By the end of 2015 and after a good run with Windows 7 and using Ubuntu just occasionally in virtual machines I thought I would give it a shot with a daily usage so I installed the 15.10 version. back then i was programming in PHP, Java and C# (because of my Software engineering Studies), php and apache had great performances locally, same for java but used a windows 7 VM for Visual Studio, Ms Office and Adobe Photoshop, because all the alternatives (Darkable/Gimp, Open office) weren't at the same levels. I tried but the more you use them the more you notice their weak points such as ease of use, backward compatibility.
I had a good (exactly 2 years) run switching between Unity and Gnome DE (I was the n°1 hater for KDE btw), but over time and even with SSD it felt a kinda slow (I was always stuck with 16.04 LTS) and honestly, I wasn’t fan of the Ubuntu’s PPAs either and then I discovered the Hackintosh community.
macOs (10.12/10.14)
So after a hell of an installation process I managed to run macOs Sierra smoothly on a laptop that has hardware near to macbook pro late 2012 (HP elitebook 840 G1). Apps installed with one simple drag n’ drop (applies to android studio too). It run the Android Virtual Device smoother than windows 7 and ubuntu with the same laptop, i was very surprised, the memory management, the apps integration and the overall stability was so great. At that time I finished my studies so no more Java or .Net programming, and the adobe/ms office suite was a strong point compared to Linux in general so every program ran natively without the need of any VM, with our beloved Unix cli.
The only drawback I had with mac, or with hackintosh, is the system updates/upgrades it was so painful to do it breaks your system every time, I was backing up the whole bootable system image whenever I attempted to update. Because the Kexts (Kernel extensions or “drivers”) weren’t always backward compatible.
So in the end i was thinking to go back to linux again but not sure which distribution i will stick with again, I wanted a stable distro that i forgot completely about something called upgrades of “big updates”. In the meantime I give Windows 10 another shot after hearing it got better and better in the last years.
And again, after 2 years with no workflow complaints I backed up my hackintosh installation and installed the last build of windows 10.
Windows 10.
I’ll resume my experience with one line: “not great, not terrible” Compared, again, to mac os the system was very smooth in every way, snapping windows, switching virtual desktops, programs and files search in the start menu, no problem but! I already missed the unix cli. Yeah I know there’s cmder and other tools. The overall performance was okay but there was some latency when compiling node js apps. My workflow didn’t change. I used Laragon for all my php projects with phpstorm and it was perfect honestly. On the other hand Android Emulator was terrible even with 8gb or ram and ssd, mac os was handling it way better.
In the meantime I played with some linux distros in VMs and made the choice: Manjaro, KDE flavor.
Manjaro:
“You said you hated KDE right?” well yes but for a cause, one I didn’t want to bring back the Gnome memories i had with Ubuntu and second, I disliked is because its similarity in UI compared to Windows in general, 10 specially then I found how very customizable was and again i’ll resume it with one line: “everything is a widget”. So in term of UI I made my simple comfortable setup.
Now in term of programs and workflow I still use PhpStorm for my php and nodejs projects, npm and yarn installed globally and surprisingly npm run very fast compared to windows and mac; git already installed, but for my php projects I migrate all of them to docker with docker compose, majority of projects were based on Laravel, Prestashop, Wordpress and old native php apps. I managed to dockerize some of them from scratch, some with Laradock.
Java/.Net: RIP.
For mobile development there were some struggles during configuring ionic and react native’s first run but done with them quickly, no problem with android studio but the emulator “again” wasn’t that good as mac os, but not that bad like windows. And I discovered a helpful package that cast my connected android device to my screen and it’s shown as a virtual device but a physical one, called scrcpy from the genymotion team!
And finally these are just some of the benefits why I picked manjaro:
No big breaking updates.
A rolling release distro.
Fast security patches.
The Great Arch User Repository (AUR)
Snap and Flatpak support (but why?)
Very stable.
But still there are some drawback, linux’s ones in general:
Still needing photoshop and lightroom.
Ms Office for work purpose (Managed to use Web version since we have ms365 but still miss Excel for heavy use)
Conclusion:
Finally and personally I’ll stick with linux for these main two reasons: native support for docker (future projects could be deployed with it) and the unix environment similarity to production servers (cli, ssh and packages’ configuration). I understand many of you will disagree for many things said in the post but that’s okay! because, finally, we choose what will help us to give the most of us in terms of productivity.
Thank you all for reading the most boring post ever made on Dev.to platform! I would gladly hear from you some of your thoughts and experiences as well. Thanks again! [1]
[1]: edit. added used stack and a conclusion.
0 notes